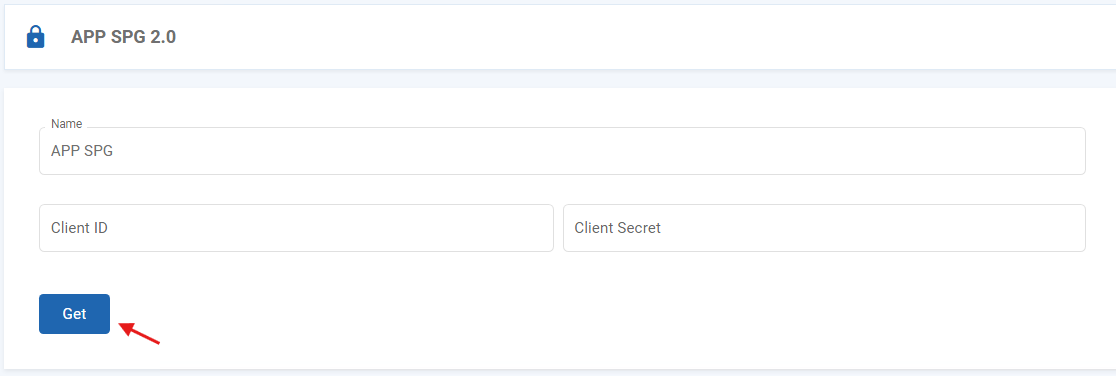
In the “SIBS Payment Gateway 2.0” > “APP SPG 2.0” you are able to generate and get the Client ID and Client Secret credentials needed in order to perform the SIBS Payment Gateway 2.0 integration.
In order to generate the credentials, click on “Get”. You will be prompted to insert your password in order to confirm the credentials generation.
If you already have a Client ID and Client Secret generated, the page will display a list with those credentials.
In the “SIBS Payment Gateway 2.0” -> “Token Configuration” you can choose if you want Tokenisation at a merchant level or at a merchant and acceptor level.
SIBS Backoffice will provide a token management according to the selected setting.
With SIBS Backoffice, you can view the card tokens generated by SPG and define tokenization rules according to your business needs.
By navigating to the Token Management section, you can access the list of card tokens that have been created. If necessary, individual tokens can be deleted by clicking the on the following icon .
In the Token Configuration menu, you can choose the level at which tokenization should be applied. The available options are:
Webhooks are a simple and powerful solution that allow you to receive notifications every time a specific event occurs. They are particularly useful for asynchronous payment methods.
To take advantage of this feature, you can easily set up webhooks to receive notifications for events within your account. This will enable you to stay informed and take appropriate actions when necessary.
In the “Webhooks” menu, you can view a list of all your webhooks. You can quickly apply filters by credential, notifications, type, and webhook (email or URL).
In “SIBS Payment Gateway 2.0” > “Webhooks” you can view a list of all configured webhooks.
By clicking the action button, you can also see the details of a specific webhook and update it if needed. You can also run a test to ensure it is working properly.
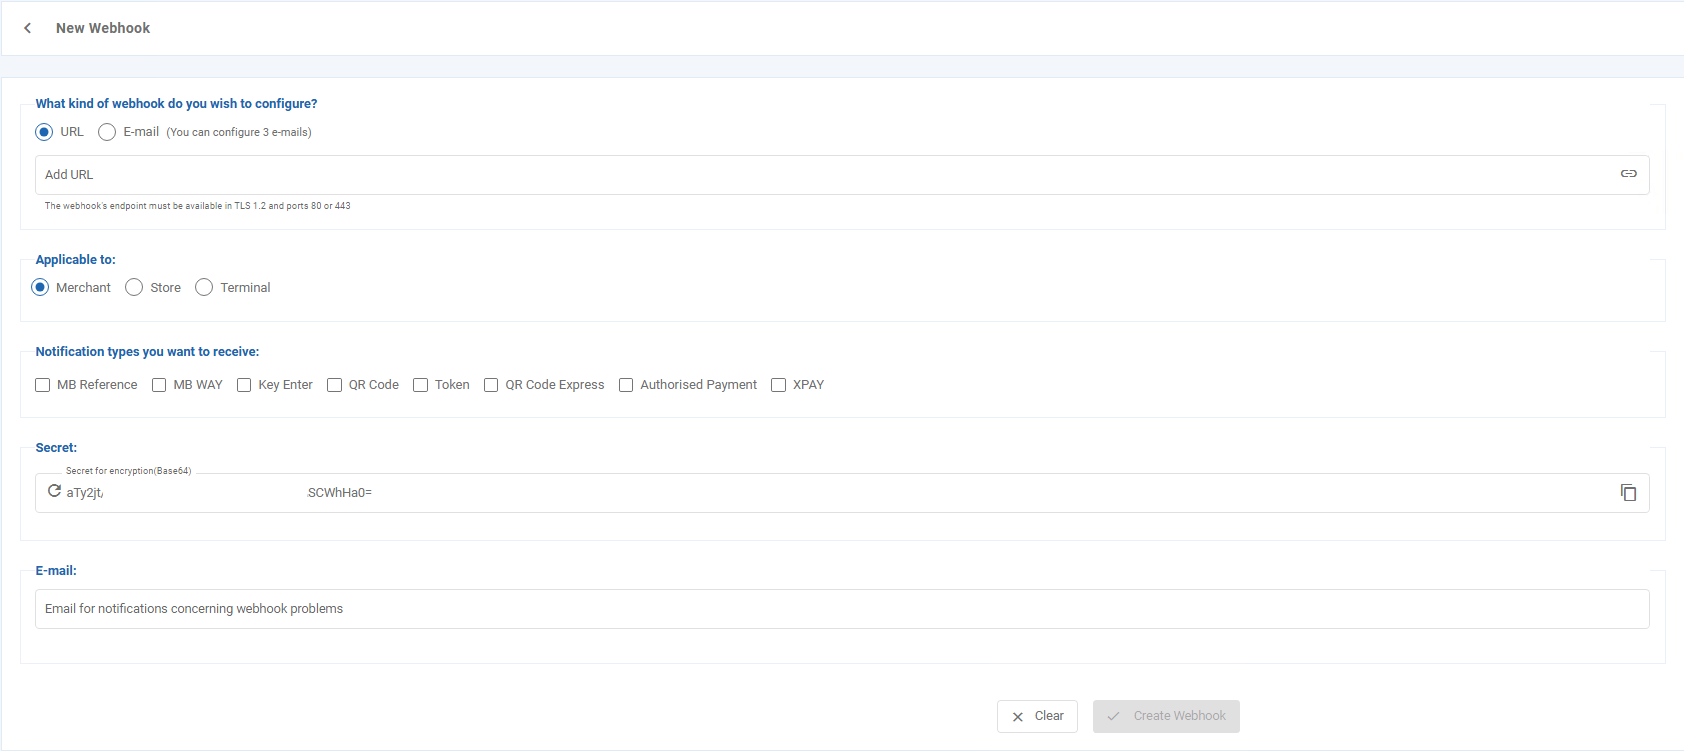
Create webhooks
In order to create a new webhook, go to “SIBS Payment Gateway 2.0” > “Webhooks” and click on the “Add new webhook” button.
Once you are presented with the webhook creation page, pick if you want to configure an URL or e-mail webhook.
Depending on the type of webhook you will need to input the URL or e-mail that will be used to receive the notifications.
MB Reference
MB WAY
Key Enter
QR Code
Token
QR Code Express
Authorized Payment
In URL type webhooks, a secret key is provided in order to keep your webhooks secure.
In URL type webhooks you are able to set an e-mail address in which alert e-mails will be sent if webhook notifications fail to be delivered.
If you want to learn more about how to integrate URL notifications click here.
The sub-menu “Credentials” will be available automatically after the merchant adheres to SIBS Payment Gateway.
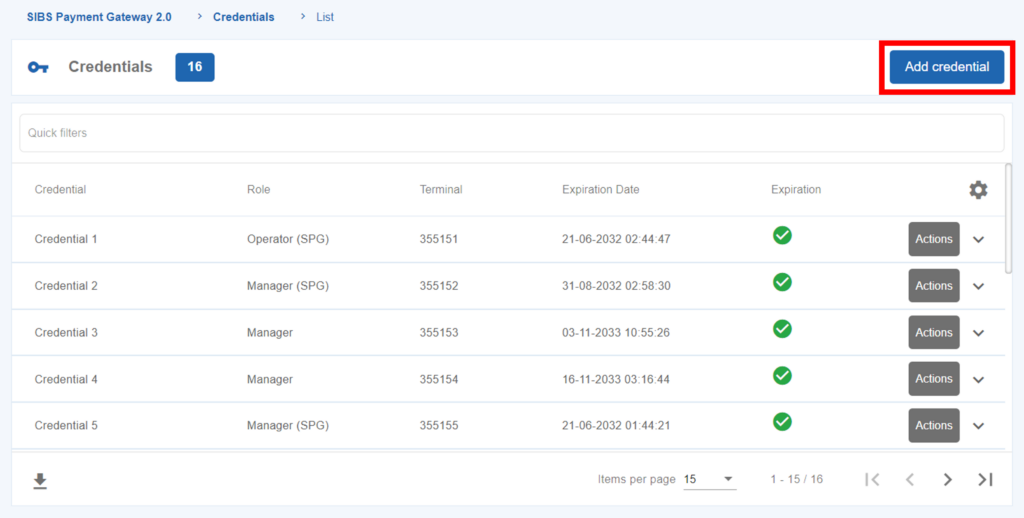
The page will show a list of all your credentials, with information such as the associated profile and terminal, expiration date and status of the credential.
Create new crendential
In order to add a new credential, go to “SIBS Payment Gateway 2.0” > “Credentials”.
Click on “Add credential”, as seen in the picture bellow.
A page with a form will open and you will need to fill the credential name and the role plus the terminal associated to the credential.
Click on “Confirm” to create a new credential. You will be prompted to input your SIBS Backoffice password in order to finish the credential creation.
SIBS Backoffice will display the generated token for the created credential. This information can also be checked in the credentials list page.
Check credentials details
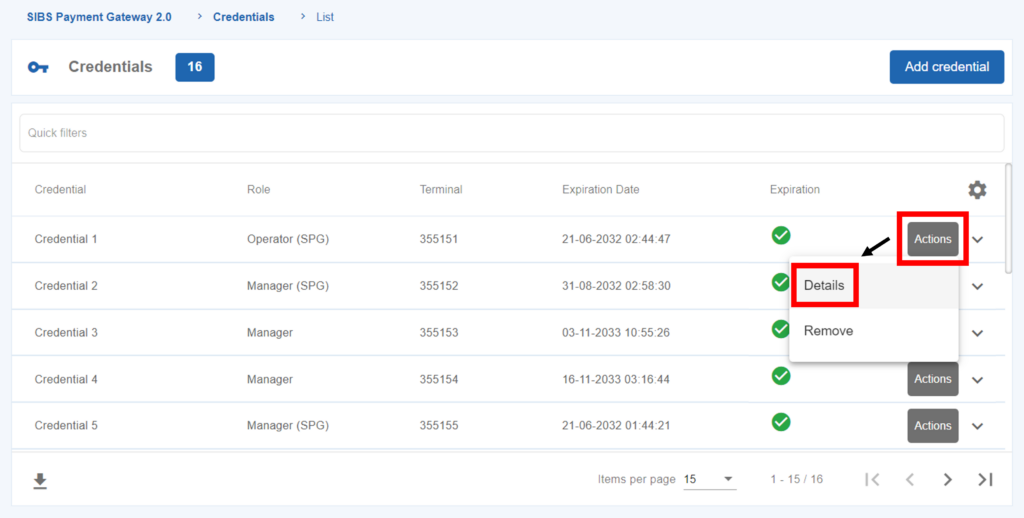
To check details of a credential, go to “SIBS Payment Gateway 2.0” > “Credentials”.
Click on the “Actions” button of a credential and then on “Details”, as seen in the picture bellow.
In order to check the credential details, you will have to input your SIBS Backoffice password.
After password confirmation, a page with the details about the credential will be shown.
Delete credentials
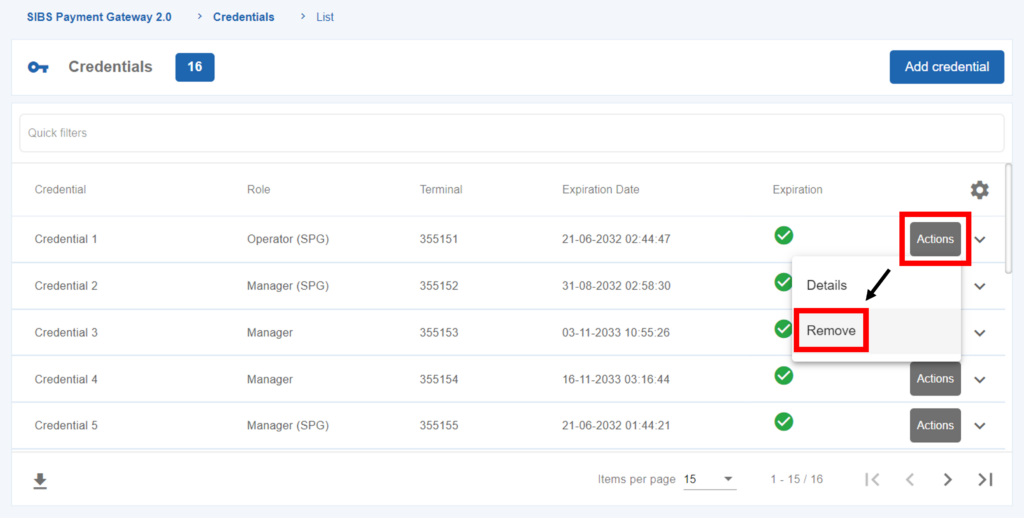
To delete a credential, go to “SIBS Payment Gateway 2.0” > “Credentials”.
Click on the “Actions” button of the credential you want to delete and then click on “Remove”.
After you click on the “Remove” button, SIBS Backoffice will prompt you to input your password. Once the password is confirmed, the credential will be removed.
vTerminal is a web-based virtual terminal that allows your business to accept MB WAY payments and generate MULTIBANCO References—all through a simple internet browser, without the need for physical POS equipment. Whether you’re selling in person, taking orders by phone, or sending payment requests via email or SMS, vTerminal gives you the flexibility to collect payments wherever your customers are.
Initial Setup
To use vTerminal, you will need to have a SIBS Payment Gateway offer under contract with your financial institution, with at least one terminal associated.
To start accepting payments via vTerminal, you’ll need to create a credential in SIBS Backoffice. Follow this guide to set it up correctly and start processing payments quickly.
Additionally, if you want to use the MULTIBANCO references payment type you will need to register at least one payment entity on SIBS Backoffice. Check Payment Entities in order to setup a payment entity.
In the case of vTerminal credentials, please consider the role Manager (SPG), in order to accept payment operations.
Accepting a Payment
Go to “SIBS Payment Gateway 2.0” > “vTerminal”.
If you have only one terminal, you will be redirected automatically to the “vTerminal” payment screen.
In case you have two or more terminals setup, a screen with a list of terminals will be displayed. You can choose the terminal you want to use by clicking on the following icon.
MB WAY
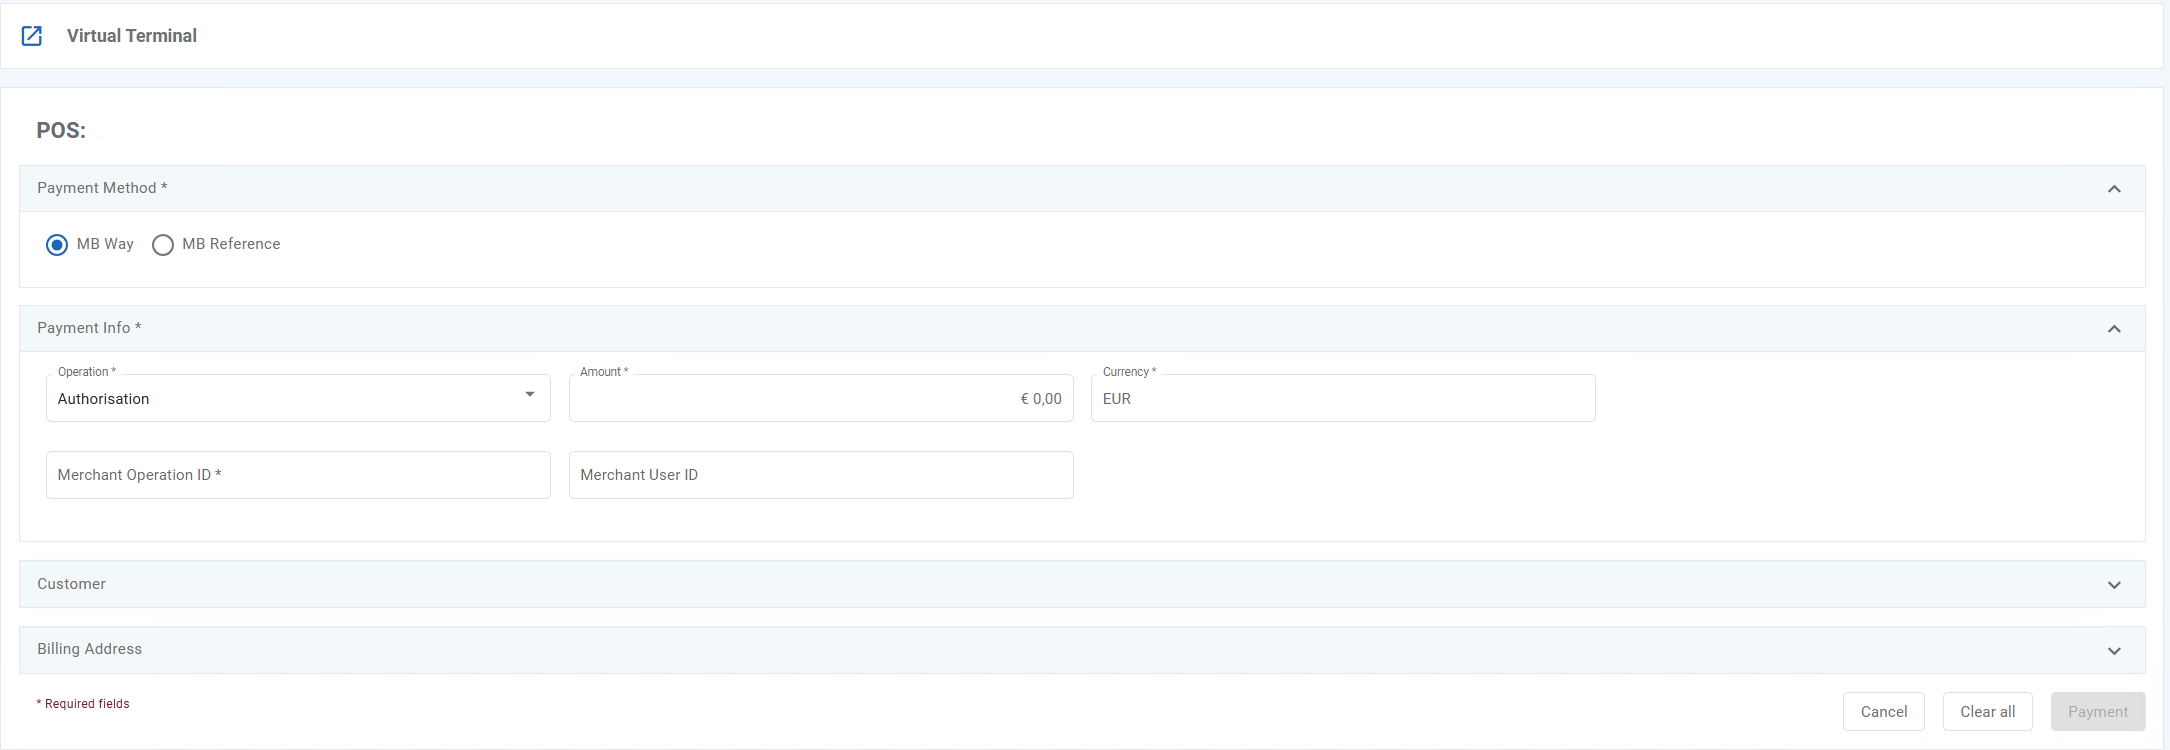
In order to accept a payment using MB WAY as the payment method, select that option and fill out the following fields:
Field
Description
Required
Operation
Payment type you want to use: – Authorization: via MB WAY; – Purchase: via MB WAY
YES
Amount
Total amount of the purchase. Minimum value of 0,01€.
YES
Currency
Euro is the predefined, non-editable currency.
YES
Merchant Operation ID
Internal merchant code ID.
YES
Merchant User ID
Client’s identificator number. To fill if the client wants to have an identification number associated to the operation.
NO
Name
Client’s name.
NO
Date of birth
Client’s date of birth.
NO
E-mail
Client’s e-mail.
NO
Country Code
Client’s country code.
NO
Mobile
Client’s mobile number.
NO
Street (Billing Address)
Billing street address.
NO
Postal code (Billing Address)
Billing postal code.
NO
Location (Billing Address)
Billing location.
NO
Country (Billing Address)
Billing country.
NO
Ship to a different address (Billing Address)
To be selected if the client’s shipping address is different from the billing address.
NO
Street (Shipping Address)
Shipping street address.
YES (if “Shipping to a different address” is selected)
Postal code (Shipping Address)
Shipping postal code.
YES (if “Shipping to a different address” is selected)
Location (Shipping Address)
Shipping location.
YES (if “Shipping to a different address” is selected)
Country (Shipping Address)
Shipping country.
YES (if “Shipping to a different address” is selected)
MULTIBANCO Reference
In order to accept a payment using MULTIBANCO references as the payment method and fill out the following fields:
Field
Description
Required
Operation
Payment type you want to use: – Generate MB Reference
YES
Amount
Total amount of the purchase. Minimum value of 0,01€.
YES
Currency
Euro is the predefined, non-editable currency.
YES
Entity
Payment Entity that will receive the payment.
YES
Merchant Operation ID
Internal merchant code ID.
YES
Merchant User ID
Client’s identificator number. To fill if the client wants to have an identification number associated to the operation.
NO
Start Date
Sets the start date of the MULTIBANCO reference.
YES
Start Hour
Sets the start hour of the MULTIBANCO reference.
YES
End Date
Sets the end date of the MULTIBANCO reference.
YES
End Hour
Sets the end hour of the MULTIBANCO reference.
YES
Name
Client’s name.
NO
Date of birth
Client’s date of birth.
NO
E-mail
Client’s e-mail.
NO
Country Code
Client’s country code.
NO
Mobile
Client’s mobile number.
NO
Send Reference
Select “SMS” or “Email” fields if you want to send the MULTIBANCO references to the client.
NO
Street (Billing Address)
Billing street address.
NO
Postal code (Billing Address)
Billing postal code.
NO
Location (Billing Address)
Billing location.
NO
Country (Billing Address)
Billing country.
NO
Ship to a different address (Billing Address)
To be selected if the client’s shipping address is different from the billing address.
NO
Street (Shipping Address)
Shipping street address.
YES (if “Shipping to a different address” is selected)
Postal code (Shipping Address)
Shipping postal code.
YES (if “Shipping to a different address” is selected)
Location (Shipping Address)
Shipping location.
YES (if “Shipping to a different address” is selected)
Country (Shipping Address)
Shipping country.
YES (if “Shipping to a different address” is selected)
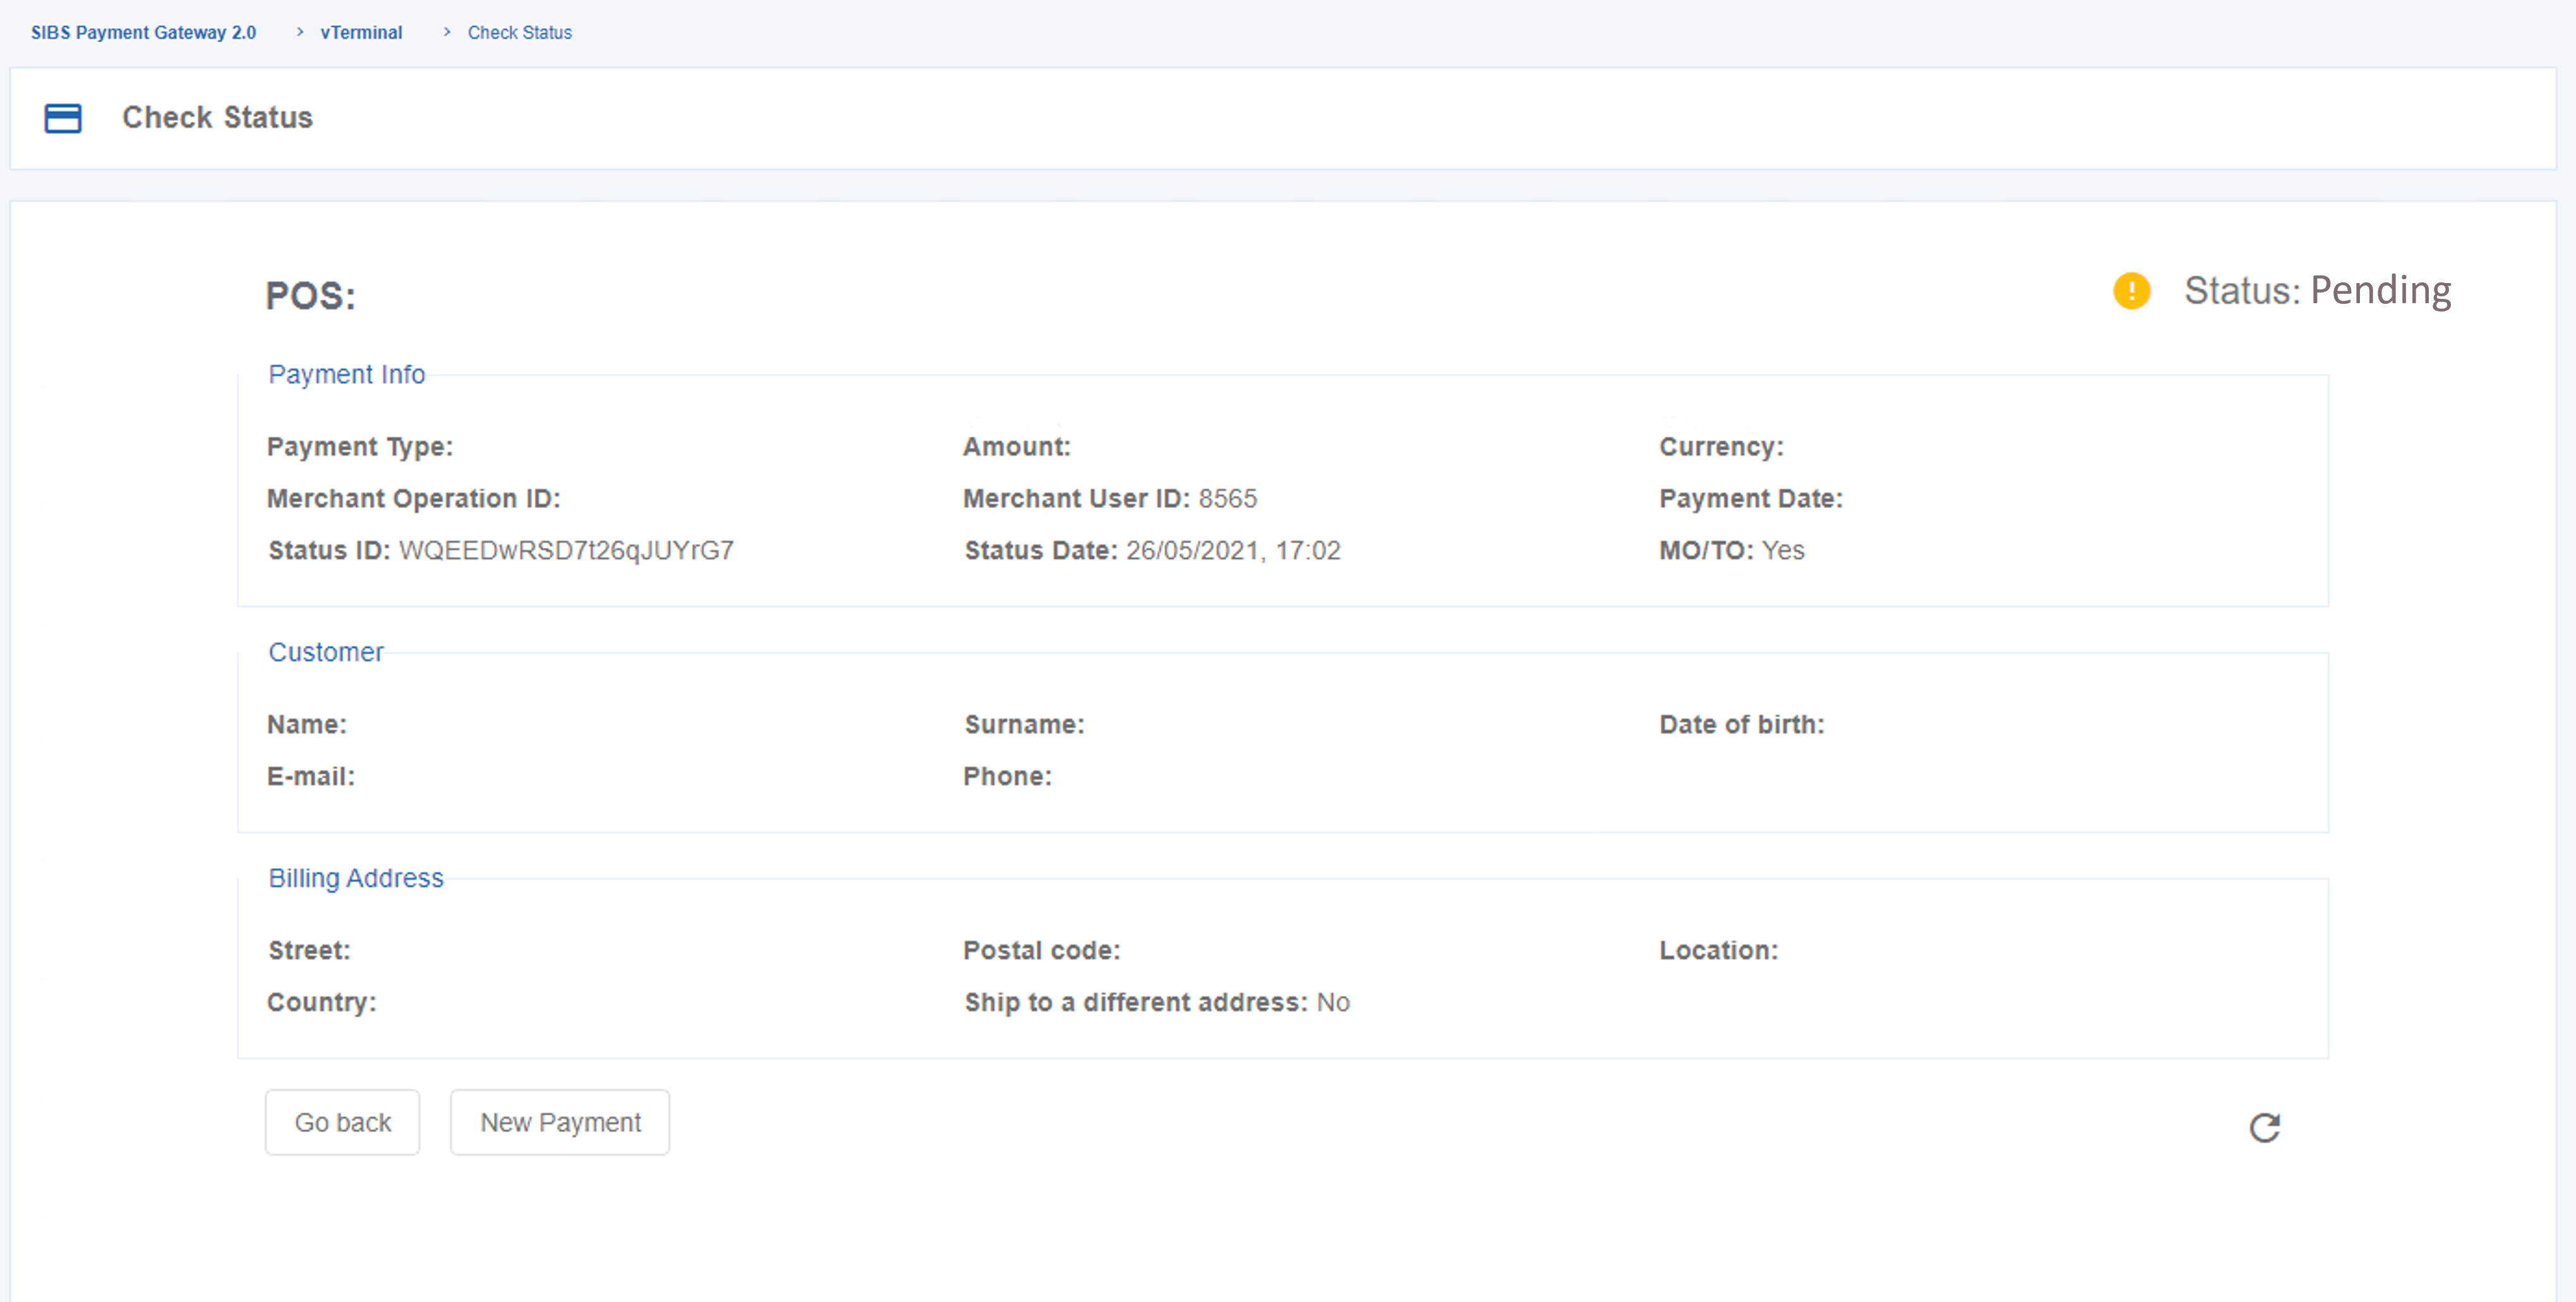
Check Payment Status
After the form is submitted, the vTerminal will display a screen in which you will be able to enter the client’s phone number and click “Confirm”.
The webpage will redirect you to a “Status” page, in which all operation details will be displayed.
Once the client performs the payment, the webpage will display a “Status: SUCCESS”.
QR Code Express enables your customers to make purchases by scanning static QR Codes using MB WAY.
This solution allows you to make payment codes available on traditional media (e.g. flyers, television ads, billboards), which customers can use MB WAY to make purchases.
A QR Code Express can be scanned by multiple users and several times by the same user, making the distribution of the codes much easier.
This type of QR Code also allows you to make purchases of physical or digital goods with the available options of instant or home deliveries.
The management of QR Code Express is done on SIBS Backoffice, in which you can control the life cycle of your QR Codes in an effortless way.
Some of the QR Code Express functionalities in SIBS Backoffice are:
Create and download QR Codes;
Edit and manage the QR Codes created (e.g. add stock, change prices or expiry dates);
Check QR Code Express transactions in real time;
Monitor QR Code Express usage;
Issue total or partial returns on purchases made using QR Code Express;
Configure real-time notifications of QR Code Express transactions (by e-mail or webhook).
Merchant Initiated Transactions (MIT) are payment transactions initiated by the Merchant, after agreement between merchant and customer.
Unlike customer-initiated transactions, a cardholder authentication is not needed in order to perform a payment.
Merchant Initiated Transactions have two distinct types:
Recurring: Recurring payments involving a transaction in which the cardholder authorizes a merchant, to debit their account on a periodic basis, for the recurring supply of goods/services over time.
UCOF (Unscheduled Credential on File): MIT UCOF is a transaction that does not have any fixed recurrence and can have any value associated.
Activate MIT
In order to start using MIT in SIBS Backoffice, you will need to have a SIBS Payment Gateway offer with MIT included under the contract with your financial institution.
Make sure you have access to a SIBS Backoffice account. If you haven’t had any onboarding process with SIBS regarding SIBS Backoffice, make sure you follow this link in order to receive credentials to the platform.
After you have all the agreements with your financial institution and access to SIBS Backoffice, the MIT submenu will be available (by clicking in the “SIBS Payment Gateway 2.0” menu > “MIT”). In order to use the MIT functionalities in SIBS Backoffice, you will need to configure the Terms & Conditions of the MIT service, located in the menu “Configuration” > “MIT” .
This link will be made available to the customer on the purchase form and serves the purpose of highlighting specific conditions of MITs to customers. You must set the T&C link according to the “Recurring”, “UCOF” or both MIT types, depending on the operation type you have set up.
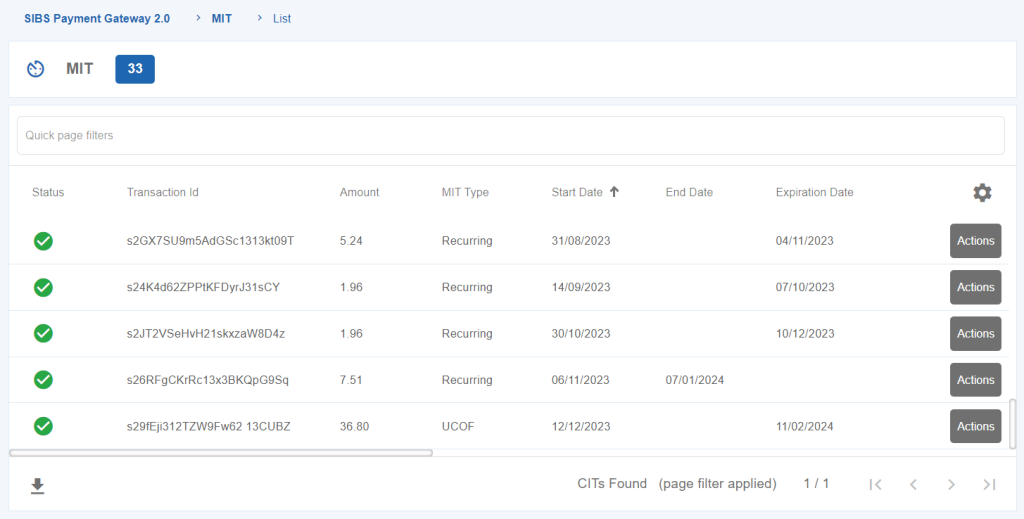
In order to check the MIT purchase list, go to the menu “SIBS Payment Gateway 2.0” > “MIT”.
Setup MIT in your payment solutions
In order to setup a MIT in payments, you will need to configure your payment solutions. If you want to know more about setup MIT in payment solutions, click here.
Once every step of the setup is performed, all the purchases using a MIT will be recorded on SIBS Backoffice.
Perform a MIT payment
In order to perform a MIT payment (either Recurring Payment or UCOF), make sure you are in the “SIBS Payment Gateway 2.0” > “MIT” subpage.
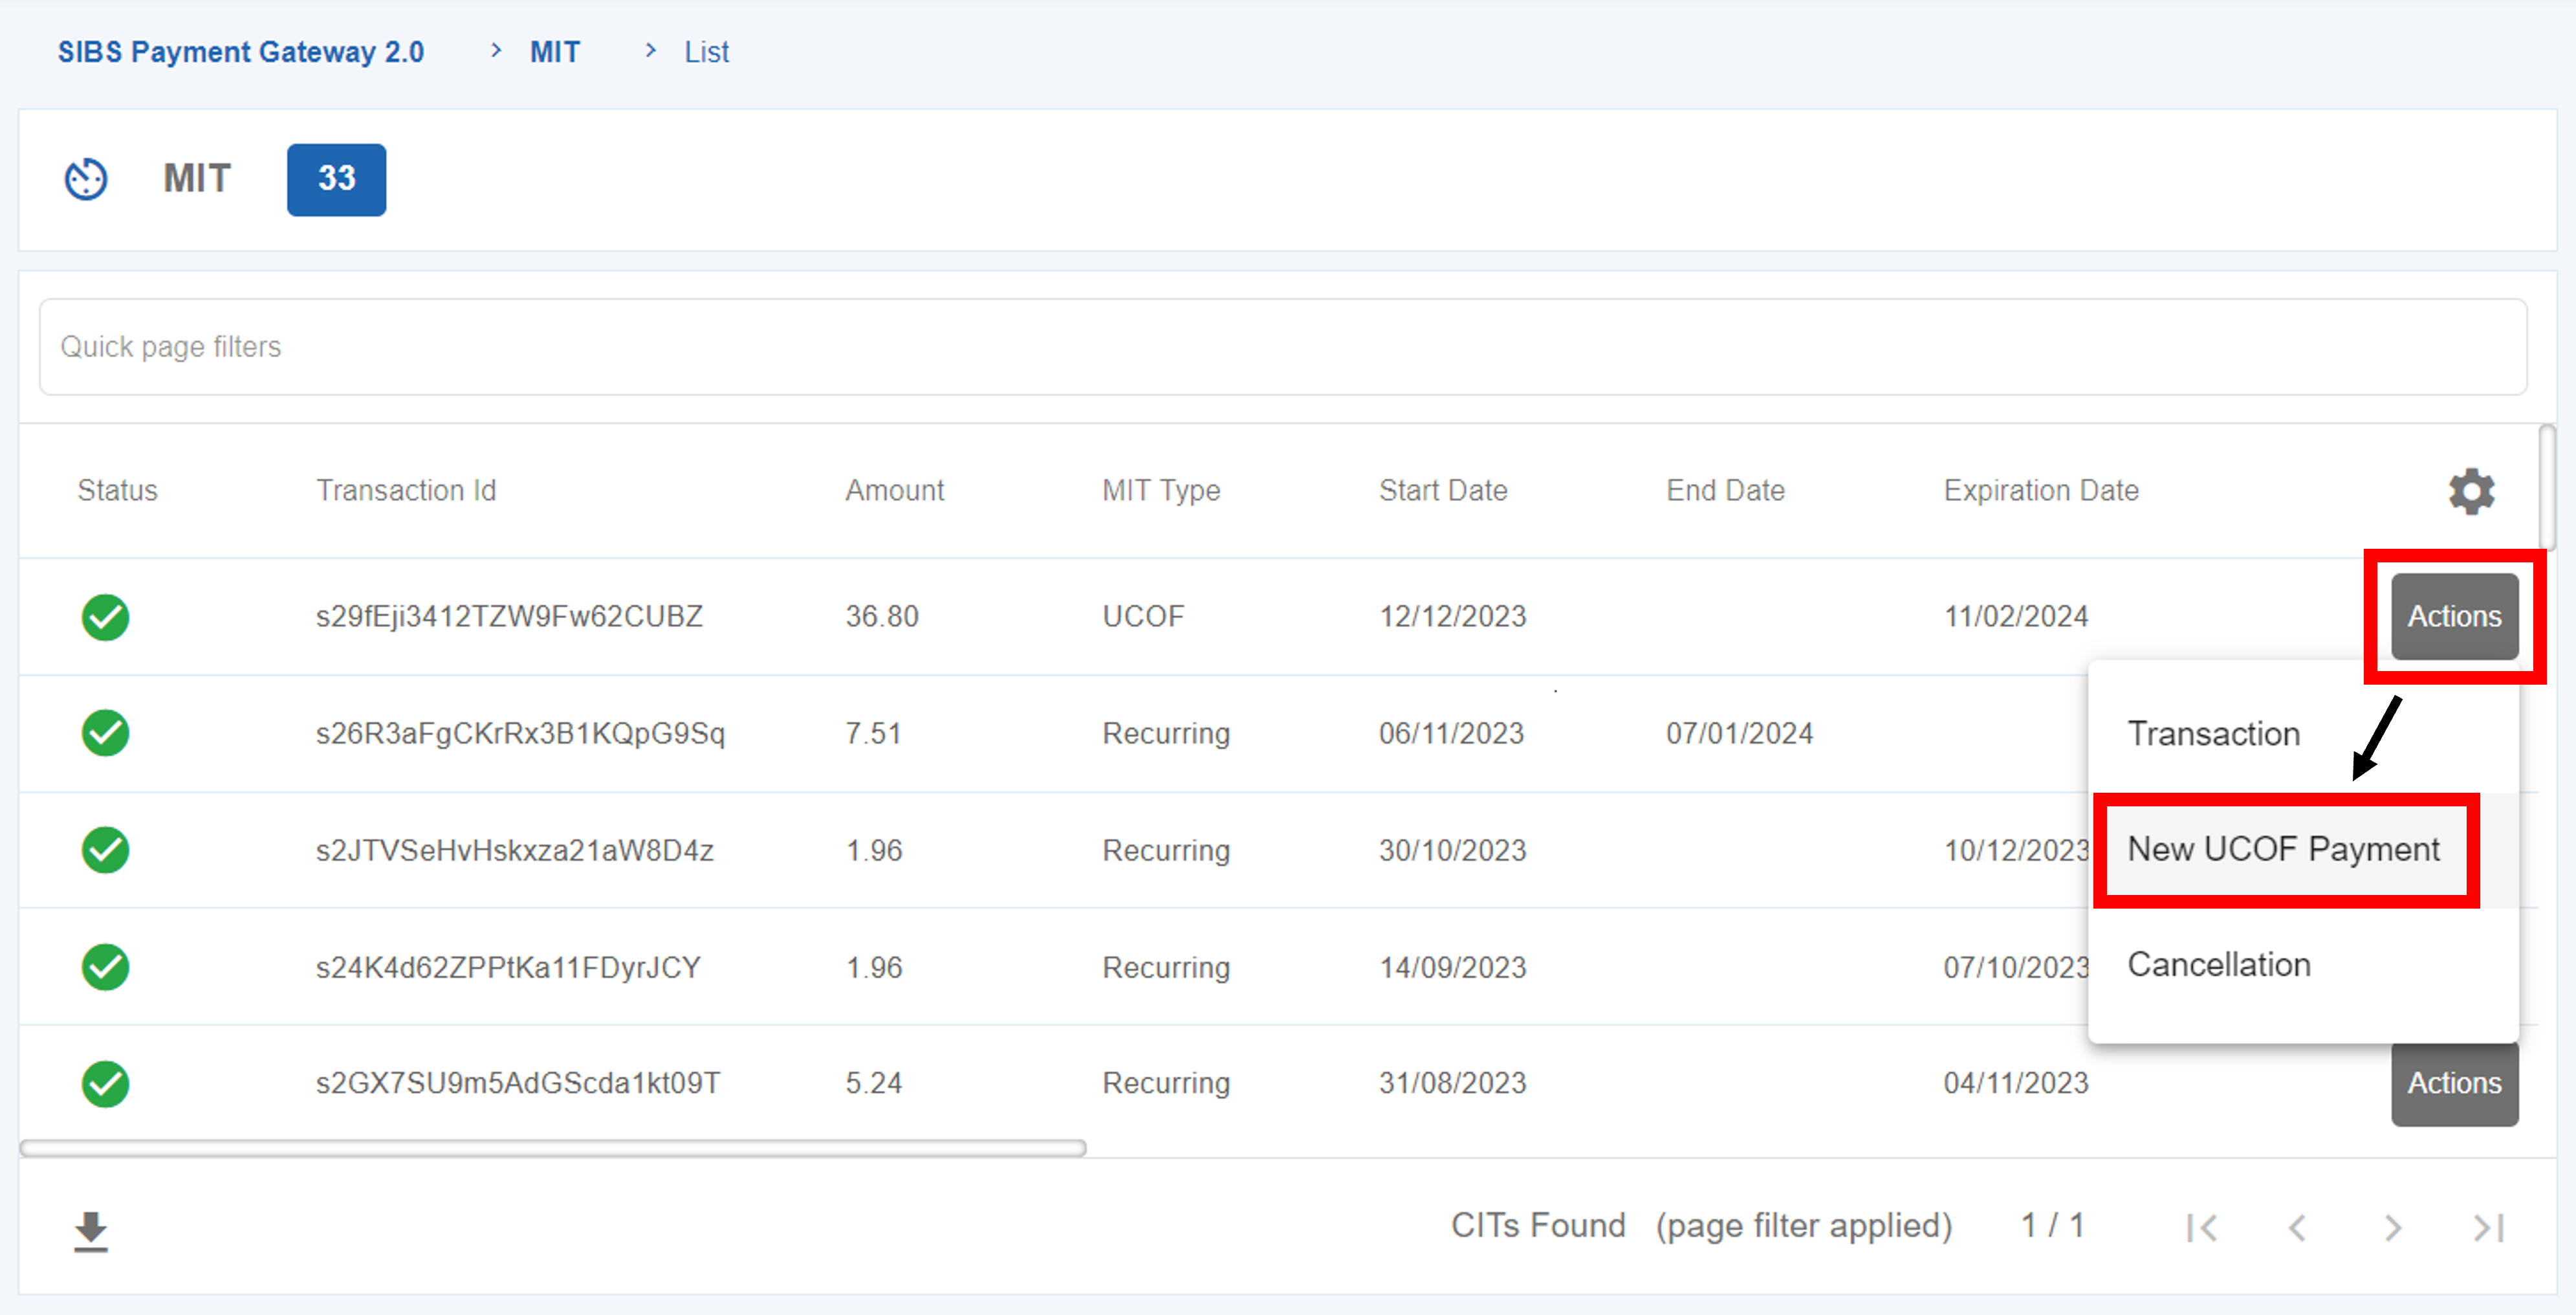
Check the MIT you want to perform a payment and click on the “Actions” button of the MIT and then on “New Recurring Payment” (if it is a Recurring Payment MIT) or “New UCOF Payment” option (if it is an UCOF Payment).
In order to make a MIT payment (either Recurring Payment or UCOF), click on the on the “Actions” button of the MIT and then on “New Recurring Payment” (if it is a Recurring Payment MIT) or “New UCOF Payment” option (if it is UCOF Payment).
Once in the payment page, you will be able to set the amount of the payment and click on the “Collect Payment” button.
If the MIT is a Recurring Payment, you will not be able to define the payment value to collect.
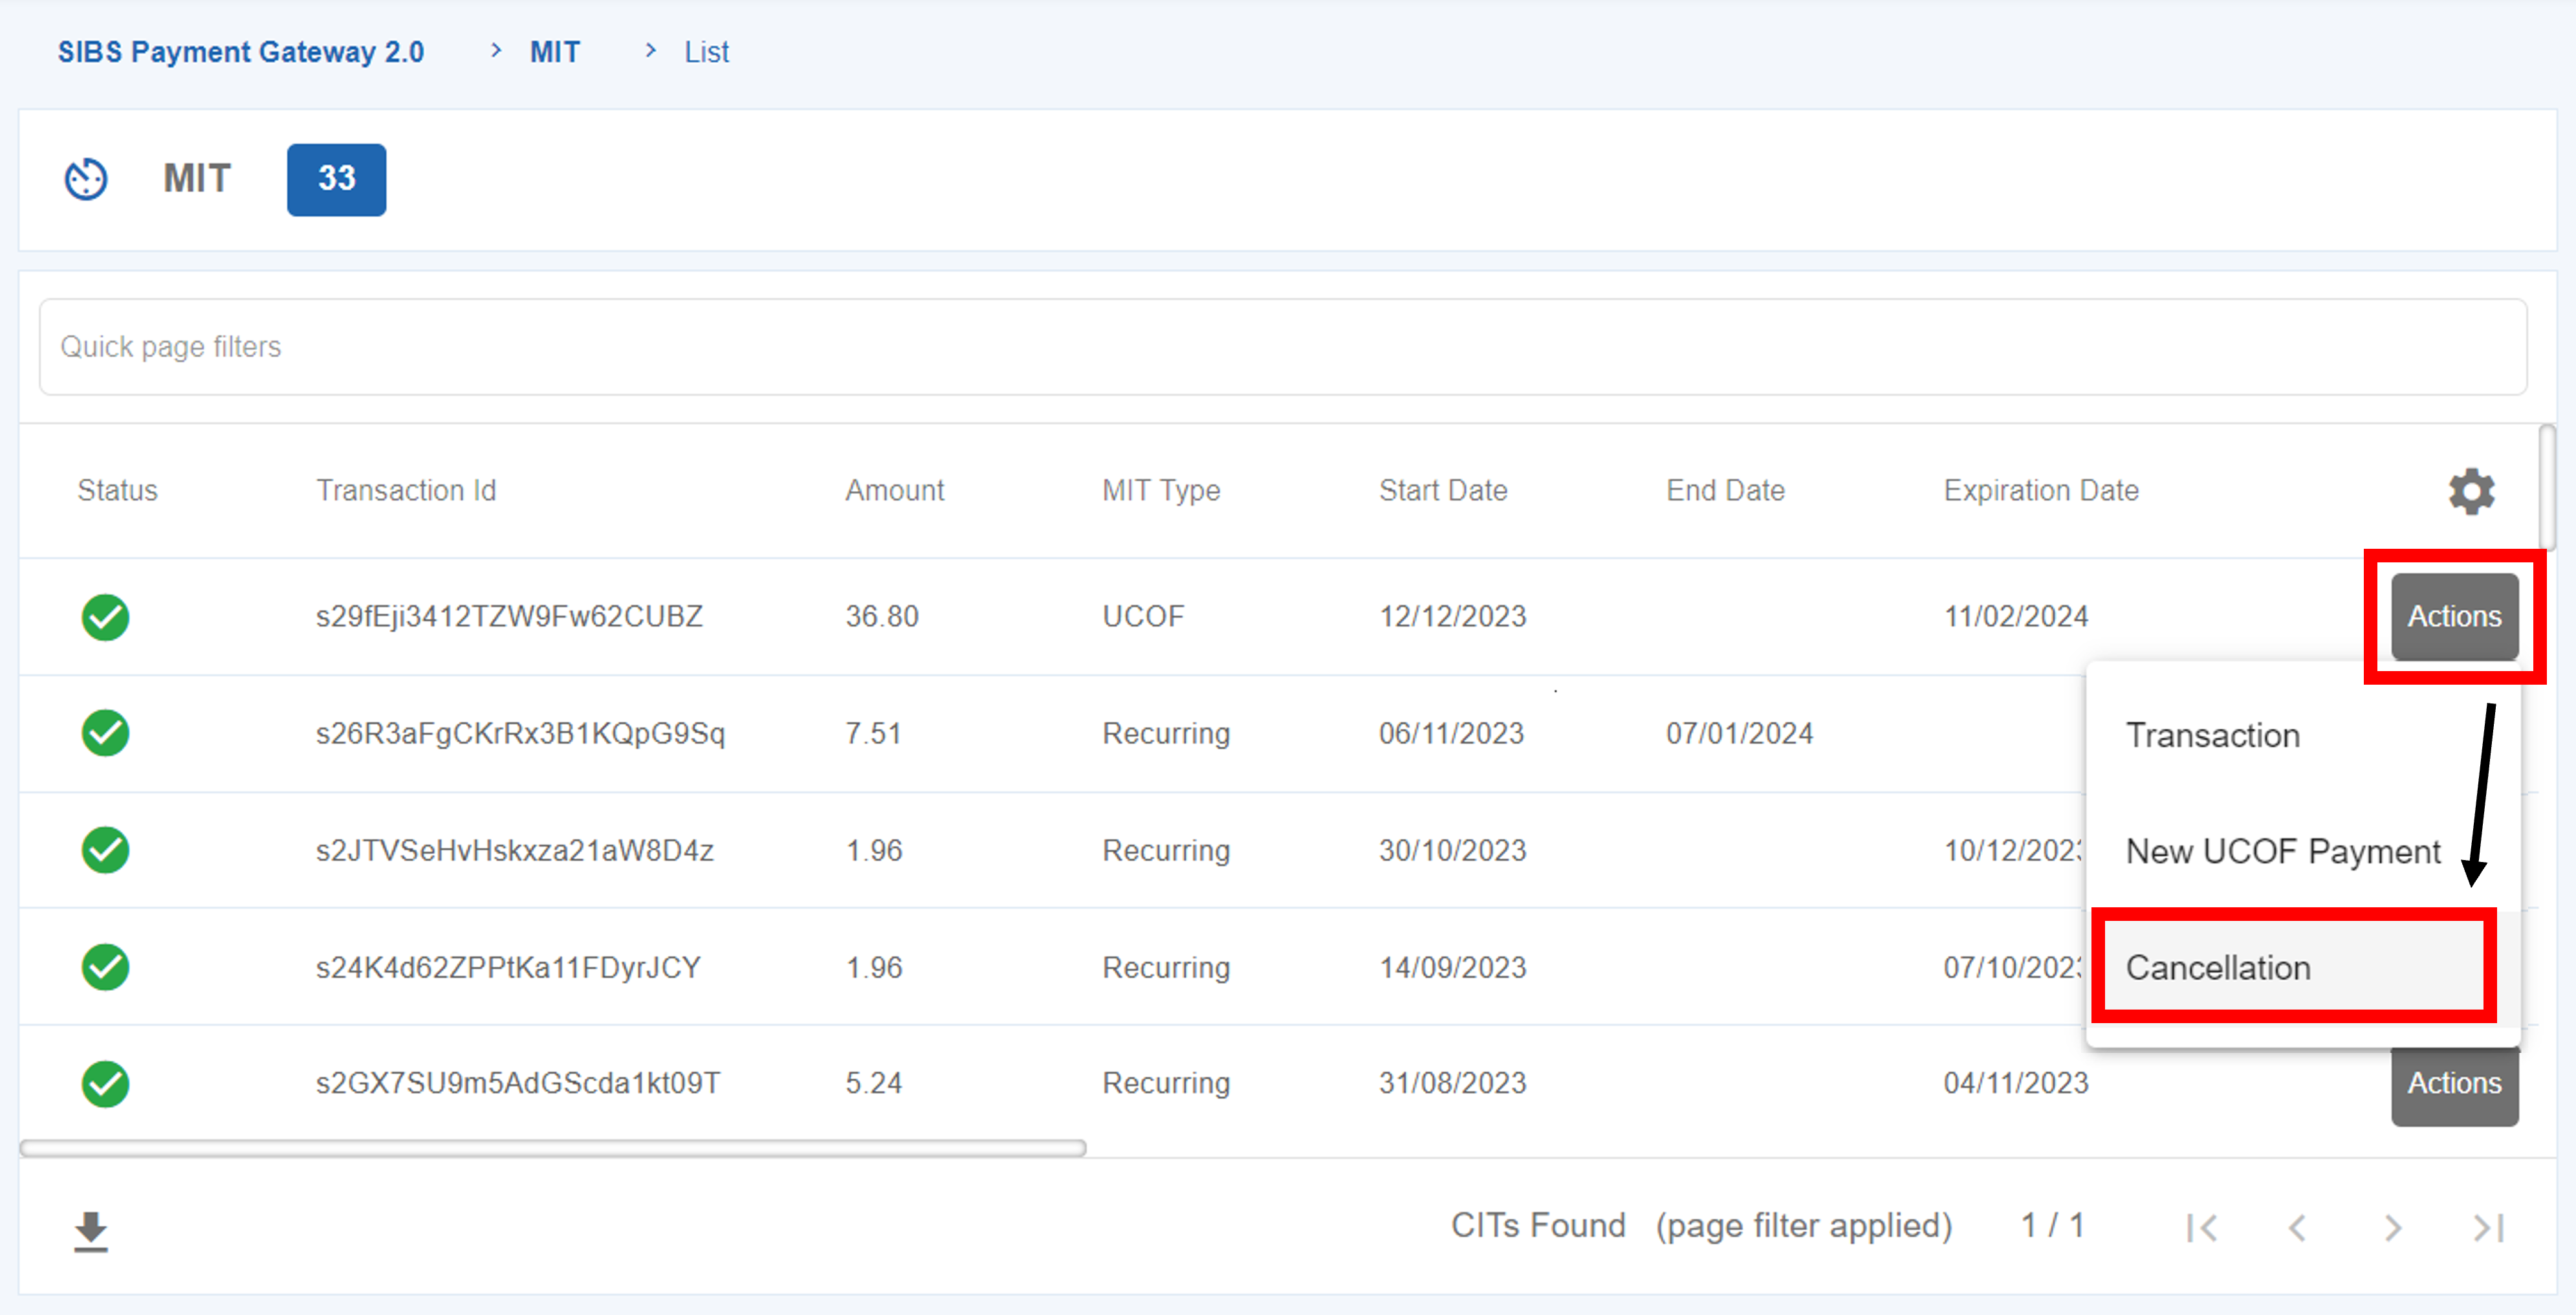
Cancel a MIT
In order to cancel a MIT (either Recurring Payment or UCOF), go to “SIBS Payment Gateway 2.0” > “MIT” subpage.
Search for the MIT you want to cancel and click on the “Actions” button and then “Cancellation”.
In the next screen you can check the details about the MIT and you will be able to click on the “Cancellation” button.
Once clicked, you will need to input your SIBS Backoffice password to confirm the cancellation of the MIT.
The Payment Gateway Management section allows you to configure and manage a wide range of products associated with your Payment Gateway. Here, you’ll find all the necessary information to correctly set up, customize, and analyze each product’s configuration and performance.
On SIBS Backoffice you have a dedicated menu to change your general settings of your account. Please, click on your profile name and go to “Settings” to enter on the user settings page.
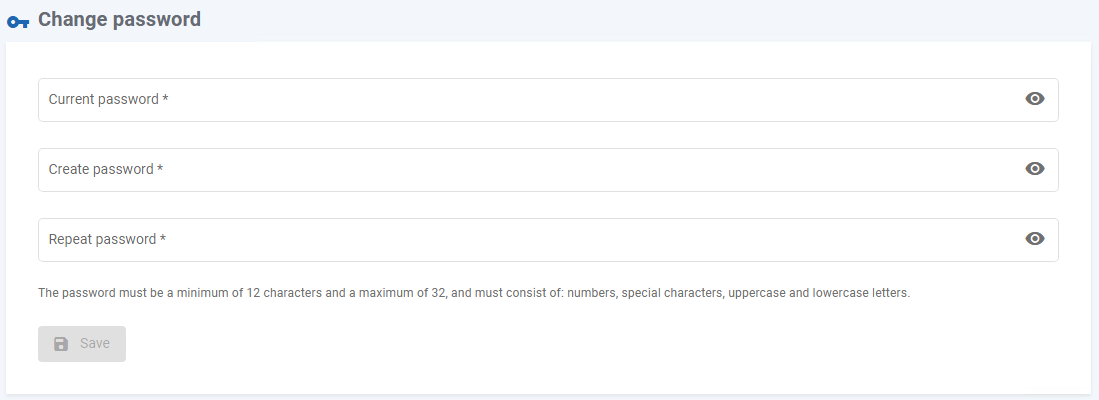
Change password
You can change the password of your profile by clicking in your profile name and go to “Settings”.
After filling the “Change password” form and setting a new password, you will be redirected to the login page, in which you will have to enter the newly set password.
The password must have a minimum of 12 characters and must have a number, a special character, an uppercase and a lowercase letter.
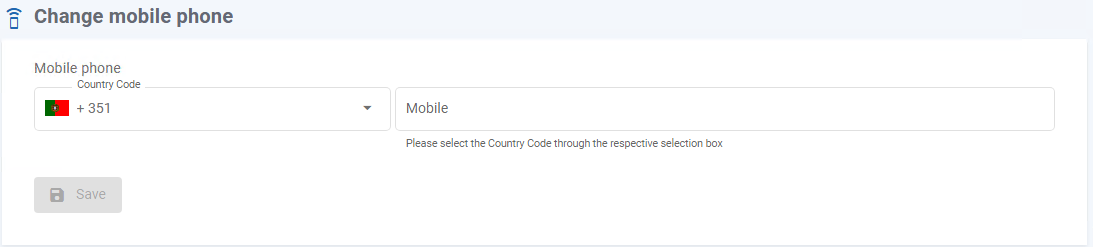
Change phone number
In order to change the mobile phone number associated to your SIBS Backoffice account, click on your profile name and go to “Settings”.
In the “Change mobile phone” form you will be able to add a new phone number and then click on “Save” to confirm your mobile phone change.
Deactivate account
In order to deactivate your SIBS Backoffice account, you will need to have an “Owner” role on SIBS Backoffice. If such is the case, click on your profile name and go to “Settings”.
On the “Deactivate account” section, click on the “Deactivate” button.
After pressing the button and confirming your action, you will receive an SMS with a confirmation code. In order to complete the account deactivation process, please enter the code received.
The deactivation of the account entails the deletion of all users associated to that account and the deletion of the information records from SIBS Backoffice.
If the owner belongs to more than one Merchant, this action will only deactivate the account that is parameterized.
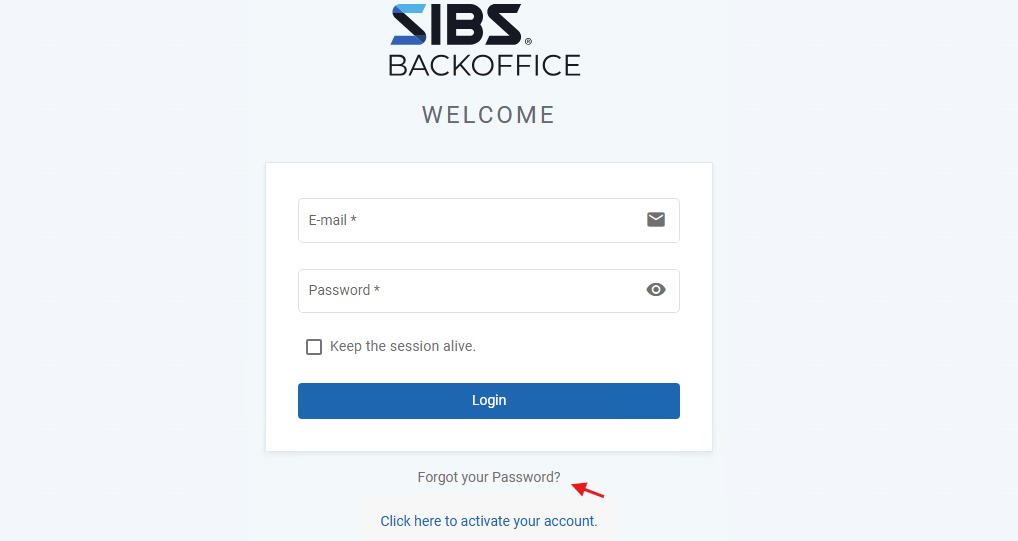
Recover password
If you forgot your SIBS Backoffice password, go to the “Login” webpage and click on “Forgot your Password?”.
You will be redirected to a new screen, in which you must enter your e-mail address and registered mobile phone. After that, you will receive an SMS with the password recover code that must be input on SIBS Backoffice.
Lastly, you will be able to set a new password and log into your account.


 .
.