

Overview
The Static QR Codes area allows merchants to create, manage, and monitor Static QR Codes associated with products and services available through the SIBS Payment Gateway.
A Static QR Code enables consumers to perform purchase transactions using the MB WAY application or participating banking applications by scanning a QR Code associated with a predefined product, merchant, and fixed amount.
Depending on the QR Code type, the payment process may optionally collect additional information from the consumer during the purchase operation.
The Static QR Codes functionality is available only for merchants who have subscribed to this service through their Financial Institution.
Accessing Static QR Codes
The Static QR Codes area is available from the SIBS Payment Gateway section of the SIBS Backoffice navigation menu.
Merchants who have subscribed to the Static QR Codes service can access all QR Code management operations from this menu.
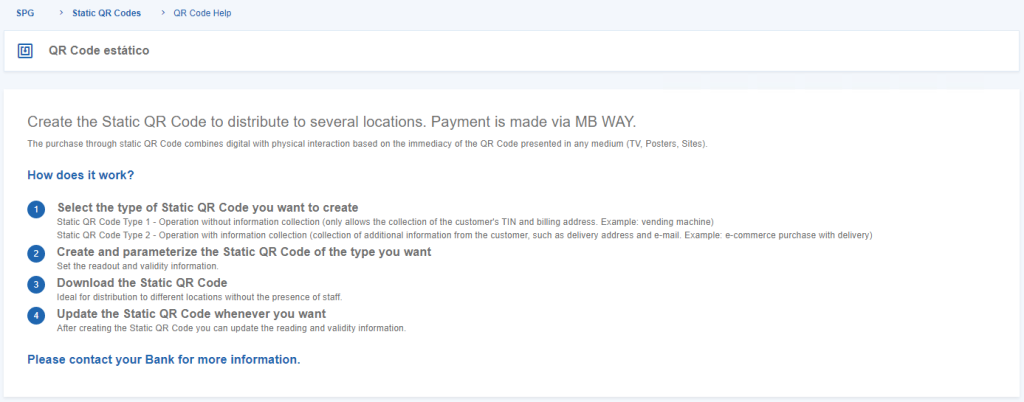
Figure 1 – Onboarding in Static QR Code feature
Creating Static QR Codes
New Static QR Codes are created directly from the Static QR Codes area of the SIBS Backoffice.
To create a new Static QR Code:
Step 1. Open the Static QR Codes menu.
Step 2. Select Create QR Code.
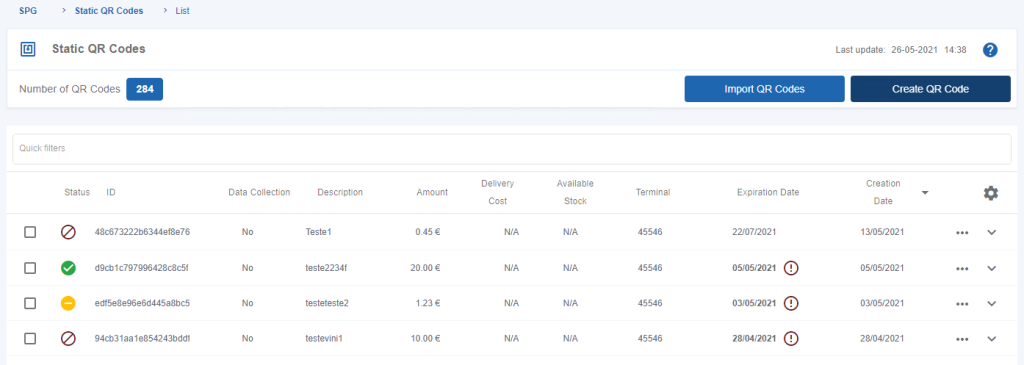
Figure 2 – “Create QR Code”
The Backoffice displays the QR Code creation form.
Two types of Static QR Codes are supported:
- Type 1 – Purchase operation without information collection.
- Type 2 – Purchase operation with information collection.
Type 1 – Purchase without Information Collection
Type 1 Static QR Codes are intended for purchase operations where no additional customer information is collected during the payment process.
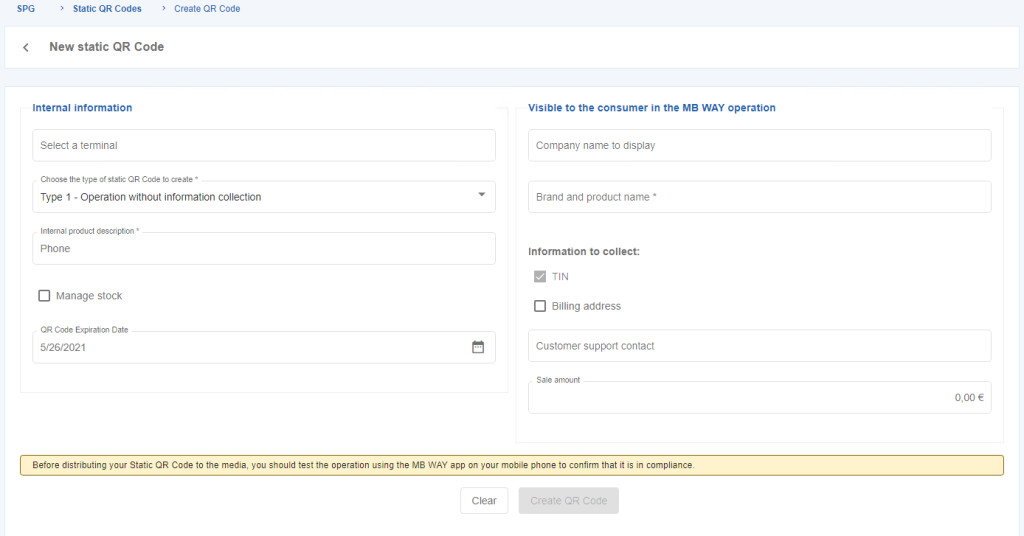
Figure 3 – Create a Static QR Code for a Purchase without data collection
Type 2 – Purchase with Information Collection
Type 2 Static QR Codes allow the merchant to request additional information from the customer during the payment process.
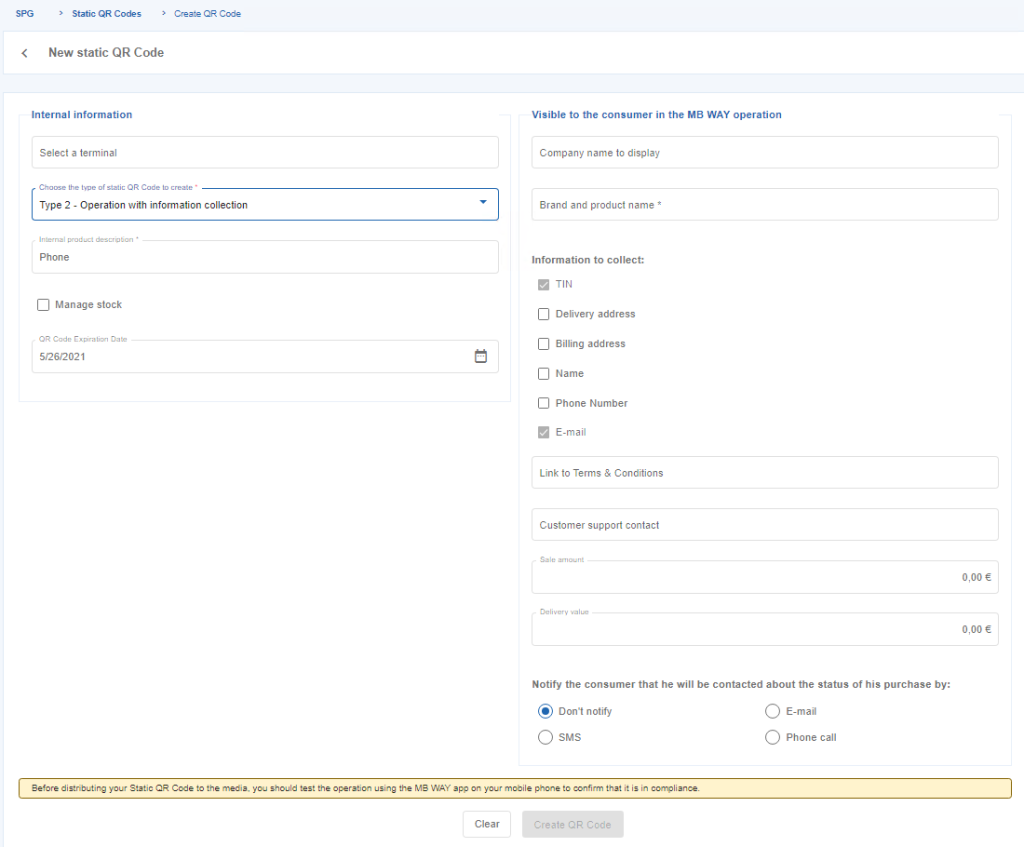
Figure 4 – Create a Static QR Code for a Purchase with data collection
Static QR Code Creation Fields
The QR Code creation form contains two categories of information:
- Internal information used by the merchant for product and inventory management.
- Information displayed to the consumer during the MB WAY payment experience.
The internal information is intended exclusively for merchant administration and is not presented to the consumer during the payment process.
Internal Information Fields
The following table describes the merchant-only fields available during Static QR Code creation.
| Field | Required | Description |
|---|---|---|
| SIBS Payment Gateway Terminal | Mandatory | Identifies the SIBS Payment Gateway terminal associated with the QR Code. When multiple terminals exist, the appropriate terminal can be selected. |
| QR Code Type | Mandatory | Defines whether the QR Code is created as Type 1 (without information collection) or Type 2 (with information collection). |
| Internal Product Description | Mandatory | Internal product description used by the merchant for identification and management purposes. |
| Initial Stock | Optional | Initial quantity available for the associated product. |
| QR Code Expiration Date | Optional | Defines the QR Code expiration date. When omitted, the maximum supported validity period (10 years) is applied. |
Consumer-visible Fields – Type 1
For Type 1 Static QR Codes, the following information may be presented to the consumer during the MB WAY payment flow.
| Field | Required | Description |
|---|---|---|
| Company Name to Display | Optional | Merchant commercial name displayed to the consumer. |
| Model and Product Name | Mandatory | Product name presented during the payment process. |
| Information to Collect | Mandatory | Defines the information elements that the merchant may request from the consumer during the purchase process, including the Tax Identification Number (TIN) and delivery information, when applicable. The TIN remains optional for the consumer even when this option is enabled. |
| Customer Support Contact | Optional | Merchant support contact information (telephone number or e-mail address). |
| Sales Amount | Mandatory | Fixed purchase amount associated with the QR Code. |
Consumer-visible Fields – Type 2
For Type 2 Static QR Codes, additional information can be collected during the payment process.
| Field | Required | Description |
|---|---|---|
| Company Name to Display | Optional | Merchant commercial name displayed to the consumer. |
| Model and Product Name | Mandatory | Product name displayed in the MB WAY application. |
| Customer Support Contact | Optional | Merchant support contact information. |
| Sales Amount | Mandatory | Fixed purchase amount associated with the QR Code. |
| Delivery Value | Optional | Delivery amount associated with the purchase, when applicable. |
| Terms and Conditions Link | Optional | URL directing the consumer to the merchant’s terms and conditions. |
| Purchase Status Notification | Optional | Defines how the consumer will be notified about the purchase status. Available options include “Do not notify“, “E-mail“, “SMS“, and “Phone call“. |
| Notification E-mail Address | Optional | Specifies the e-mail address used for purchase status notifications, when applicable. |
Managing Product Stock
Static QR Codes may optionally include inventory control. When stock management is enabled during Static QR Code creation, the merchant specifies the initial stock quantity. As purchases are completed using the Static QR Code, the available stock is automatically decreased, allowing the remaining inventory to be tracked directly from the SIBS Backoffice.
When stock management is enabled, merchants can adjust the available quantity directly from the Static QR Code list.
To manage product stock:
Step 1. Locate the required Static QR Code.
Step 2. Select Manage Stock.
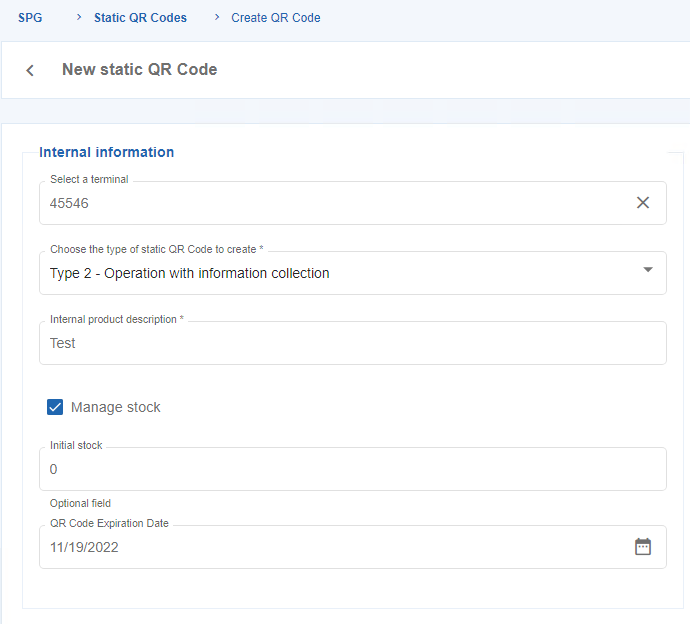
Figure 5 – “Manage stock” of products associated to a Static QR Code
The stock management screen is displayed.
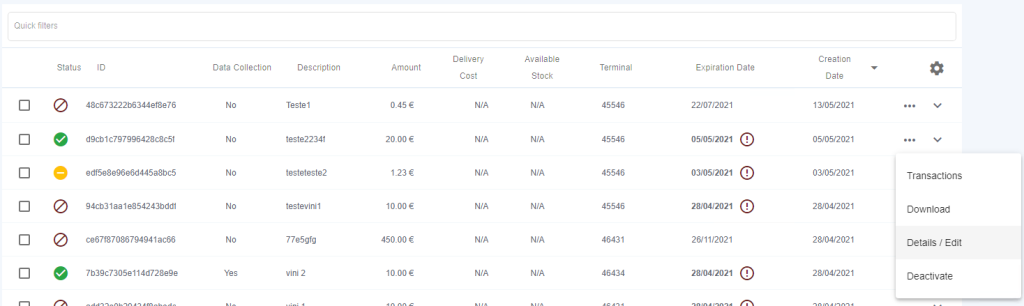
Figure 6 – Edit the stock of a product associated to a Static QR Code
Step 3. Use the + and − controls to increase or decrease the available stock according to the required inventory adjustment. The resulting quantity is automatically reflected in the Available Stock field.

Figure 7 – Add or decrease available stock
After confirmation, the updated stock quantity becomes immediately available for subsequent payment operations.
Viewing Static QR Codes
After a Static QR Code has been created, it is displayed in the Static QR Codes list.
The list provides a consolidated view of all Static QR Codes associated with the selected merchant. Users can search for specific QR Codes using the available Quick Filters, allowing the list to be filtered according to the characteristics of the registered Static QR Codes.
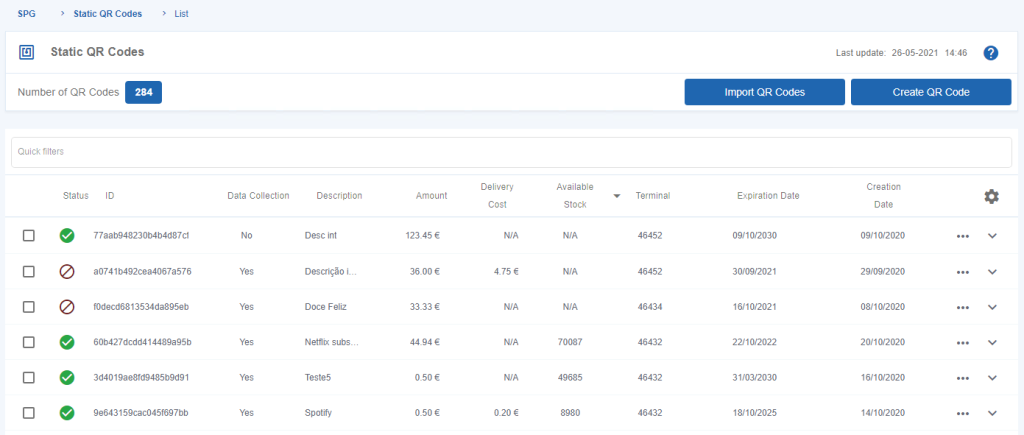
Figure 8 – Static QR Code List
Figure 8 illustrates the Static QR Codes list presented in the Backoffice. The information displayed for each Static QR Code is described below.
Static QR Code List Fields
The following table describes the information displayed for each Static QR Code.
| Field | Description |
|---|---|
| Status | Indicates the current status of the Static QR Code. Possible values are Active, Inactive, and Suspended by SIBS. |
| ID | Internal product identifier associated with the Static QR Code. |
| With Information Collection | Indicates whether the QR Code collects additional information from the consumer. Possible values are Yes and No. |
| Description | Product description presented to the consumer during the payment process. |
| Amount | Fixed purchase amount associated with the Static QR Code. |
| Delivery Value | Delivery cost associated with the purchase, when applicable. |
| Available Stock | Current quantity of products available for sale. |
| Expiration Date | Date on which the Static QR Code expires. |
| Creation Date | Date on which the Static QR Code was created. |
Downloading Static QR Codes
The Backoffice allows merchants to download individual or multiple Static QR Codes.
Downloading a Single Static QR Code
To download a Static QR Code:
Step 1. Locate the required Static QR Code.
Step 2. Open the Options menu.
Step 3. Select Download.
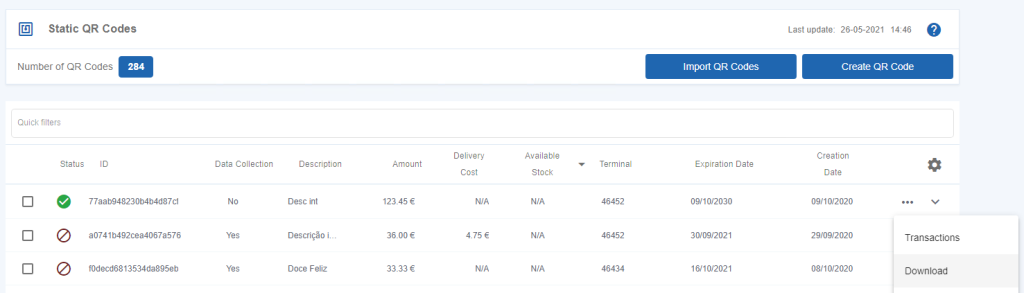
Figure 9 – Download Static QR Code
The Backoffice downloads a ZIP archive containing:
- The product’s internal description.
- A PNG image containing:
- Company name to display.
- Model and product name.
- Information to collect.
- Customer support contact.
- Sales amount.

Downloading Multiple Static QR Codes
Multiple Static QR Codes can be downloaded simultaneously.
To download multiple QR Codes:
Step 1. Select the required Static QR Codes.
Step 2. Open the More Options menu (three vertical dots).
Step 3. Select Download Selected.
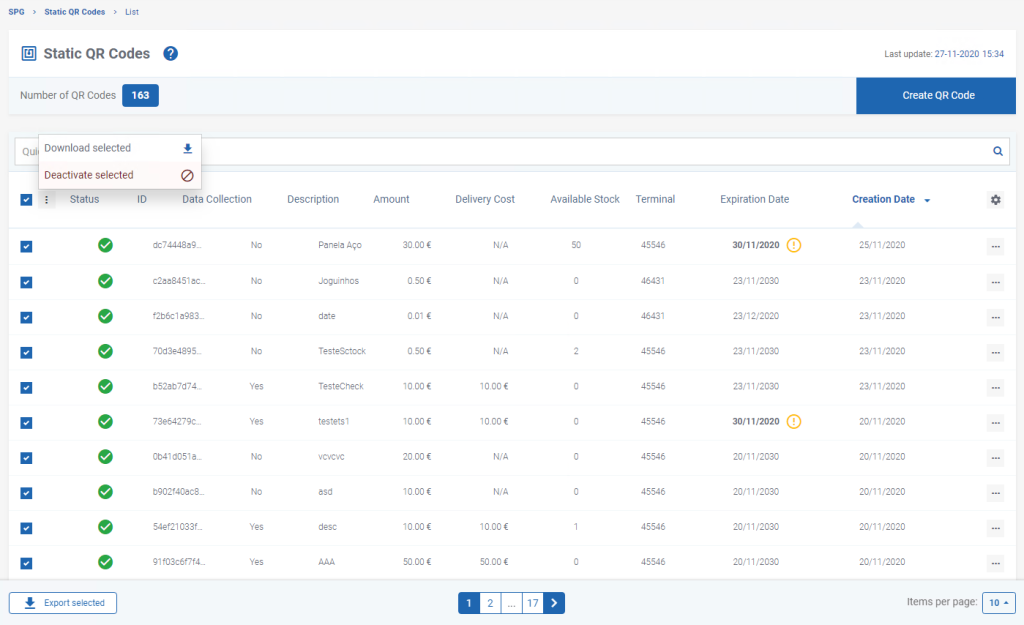
Figure 10 – Download Multiple Static QR Codes
The selected Static QR Codes are downloaded in a single ZIP archive containing one PNG image for each selected QR Code.
Editing Static QR Codes
Authorized users can update information associated with an existing Static QR Code.
The following information can be modified:
- Status.
- Available stock (when stock management is enabled).
- QR Code expiration date.
- Model and product name.
- Terms and Conditions link.
- Customer support contact.
- Sales amount.
- Delivery value (Type 2 QR Codes only).
Editing a Type 1 Static QR Code
To edit a Type 1 Static QR Code:
Step 1. Locate the required QR Code.
Step 2. Open the Options menu.
Step 3. Select Detail/Edit.
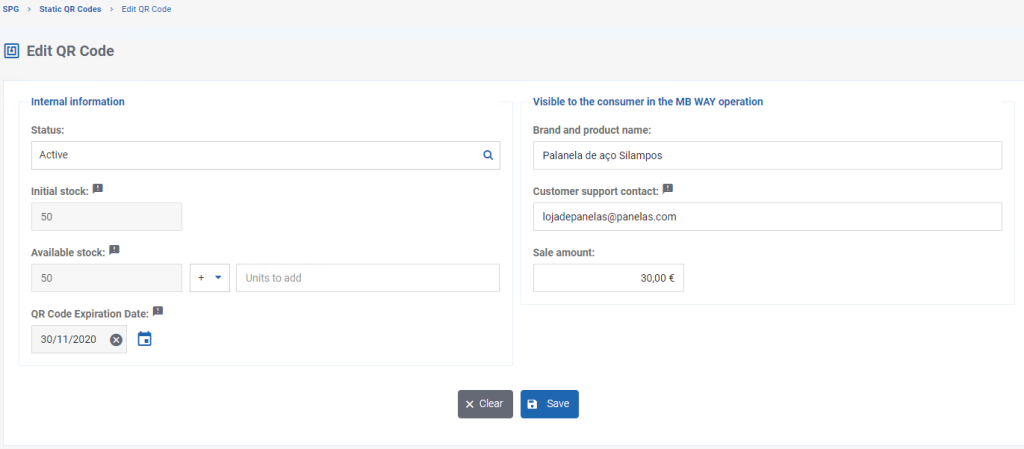
Figure 11 – Edit a Static QR Code of Type 1
Update the required information and save the changes.
Editing a Type 2 Static QR Code
Type 2 Static QR Codes are edited using the same procedure.
The edit form additionally allows modification of the delivery value and other fields specific to QR Codes with information collection.
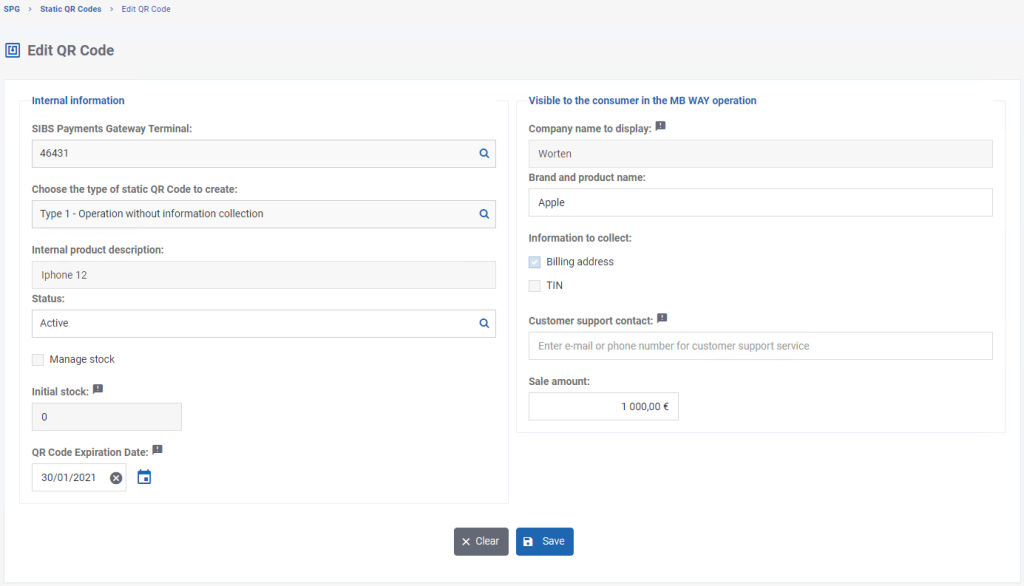
Figure 12 – Edit a Static QR Code of Type 2
Deactivating Static QR Codes
When a Static QR Code is deactivated, it can no longer be used to perform payment operations.
Deactivating a Single Static QR Code
To deactivate a Static QR Code:
Step 1. Locate the required Static QR Code.
Step 2. Open the Options menu.
Step 3. Select Deactivate.
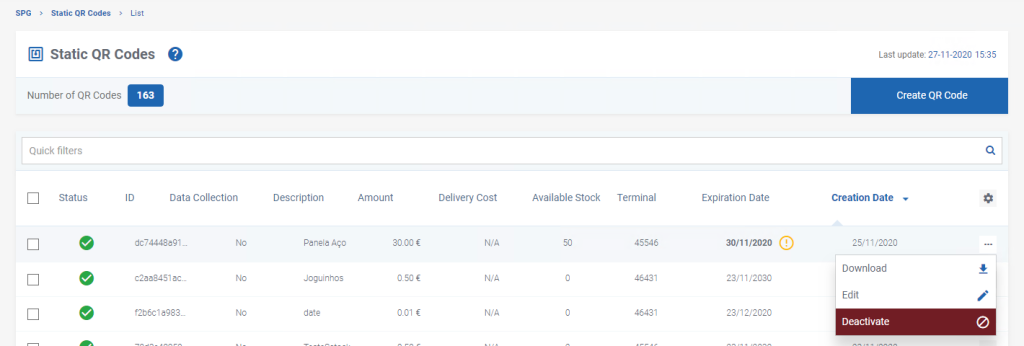
Figure 13 – Deactivate a Static QR Code
A confirmation dialog is displayed showing:
- Purchase amount.
- Product description.
- QR Code creation date.
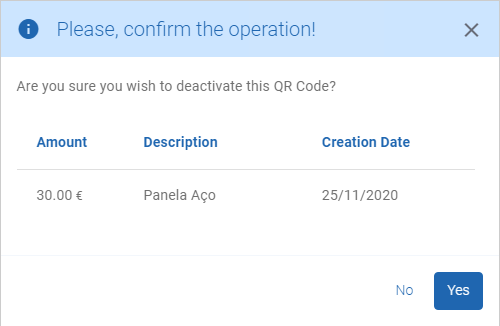
Figure 14 – Confirm a Static QR Code Deactivation
Step 4. Confirm the operation.
After confirmation, the Static QR Code becomes unavailable for future payment operations.
Deactivating Multiple Static QR Codes
The Backoffice also supports bulk deactivation.
To deactivate multiple Static QR Codes:
Step 1. Select the required Static QR Codes.
Step 2. Open the More Options menu (three vertical dots).
Step 3. Select Deactivate Selected.
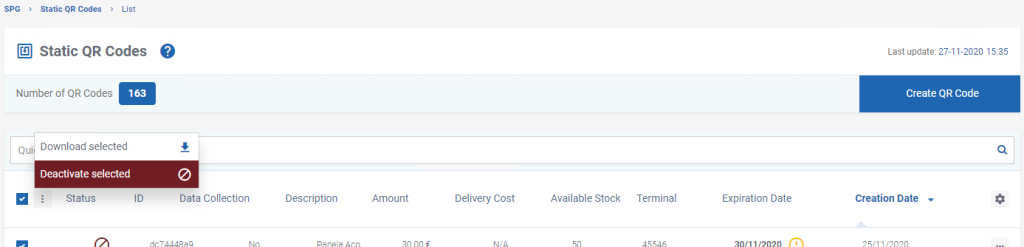
Figure 15 – Deactivate Multiple Static QR Codes
A confirmation screen displays all selected Static QR Codes.
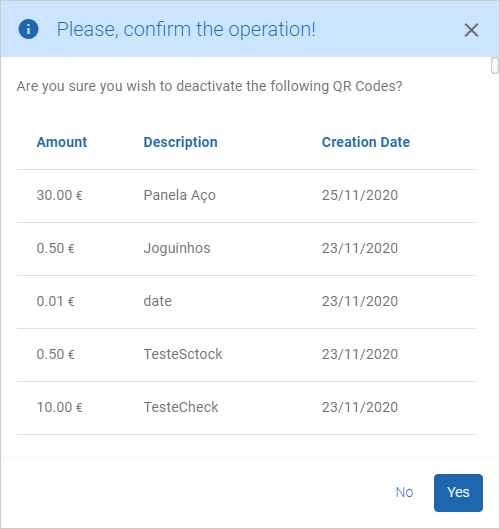
Figure 16 – Confirm Deactivation of Multiple Static QR Codes
Step 4. Confirm the operation.
All selected Static QR Codes are deactivated simultaneously.
Viewing Transactions Associated with a Static QR Code
The SIBS Backoffice allows users to review all transactions associated with a specific Static QR Code.
To display the transactions associated with a Static QR Code:
Step 1. Locate the required Static QR Code in the Static QR Codes list.
Step 2. Select the corresponding Static QR Code entry.
The Backoffice automatically redirects the user to the Transactions area, displaying the operations associated with the selected Static QR Code.
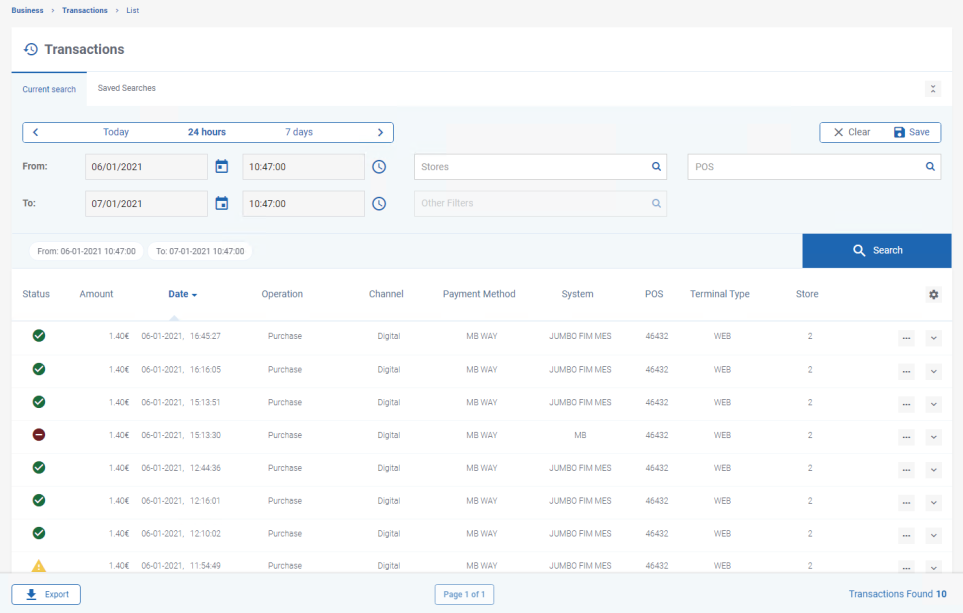
Figure 17 – Inquire a Static QR Code’s Operations in the Transaction List
The transaction list displays all operations associated with the selected Static QR Code.
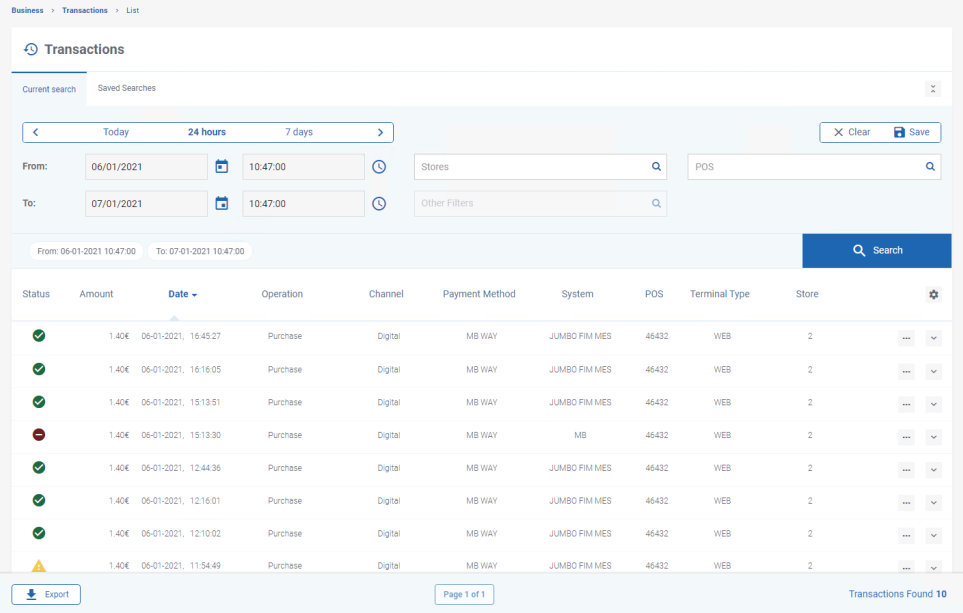
Figure 18 – List of Operations Associated to a Given Static QR Code
Users can then inspect each transaction using the standard transaction management functionality described in G.1.4 – Transaction Management.
Refunding Static QR Code Purchases
Purchases performed using Static QR Codes can be refunded directly from the associated transaction list.
To initiate a refund:
Step 1. Locate the transaction to be refunded.
Step 2. Open the Options menu (three vertical dots).
Step 3. Select Refund.
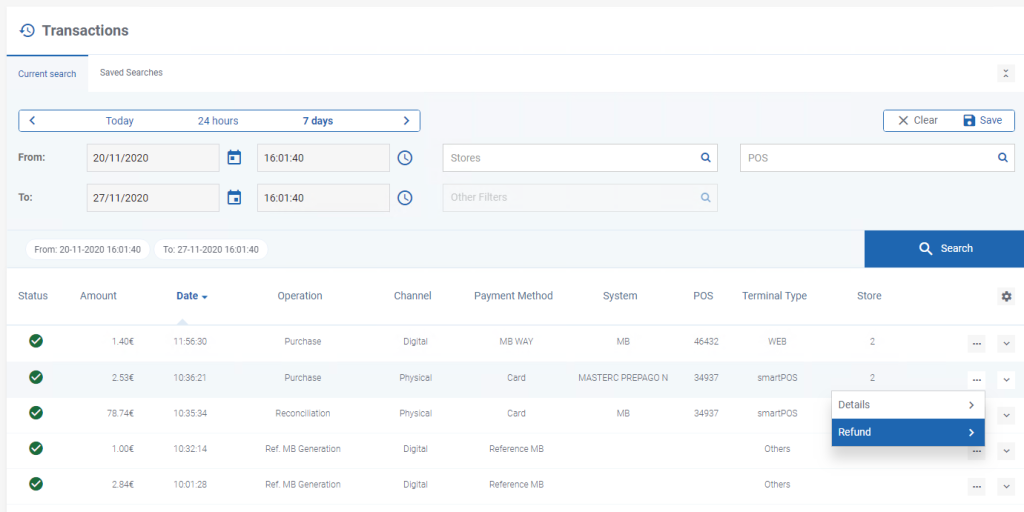
Figure 19 – Refund of a Purchase with Static QR Code
The refund screen is displayed.
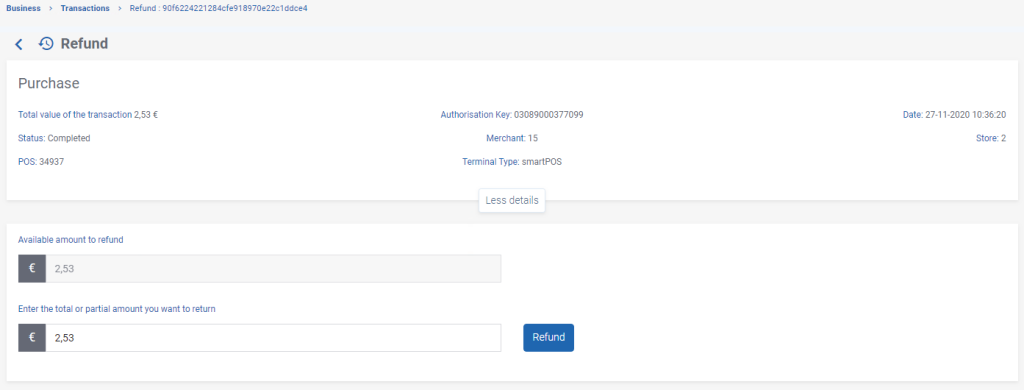
Figure 20 – Enter Refund Amount of a Purchase with a Static QR Code
Step 4. Enter the refund amount.
The Backoffice supports both:
- Full refunds, by entering the complete purchase amount.
- Partial refunds, by entering a lower amount.
Step 5. Confirm the refund operation.
Searching for Static QR Code Transactions
The SIBS Backoffice allows users to search for transactions associated with Static QR Codes by using the available transaction filters.
To search for Static QR Code transactions:
Step 1. Open the Transactions area.
Step 2. Expand Other Filters.
Step 3. Select the Static QR Code filter.
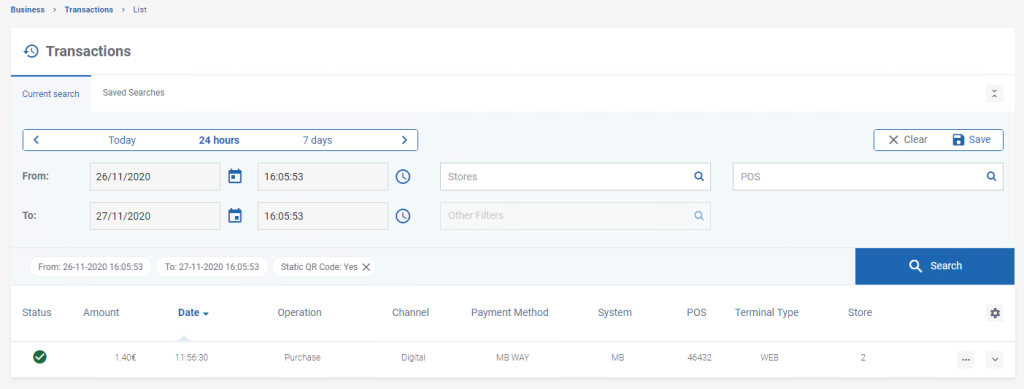
Figure 21 – Static QR Code Search Filter
The Payment Method filter can also be used to further refine the search results.
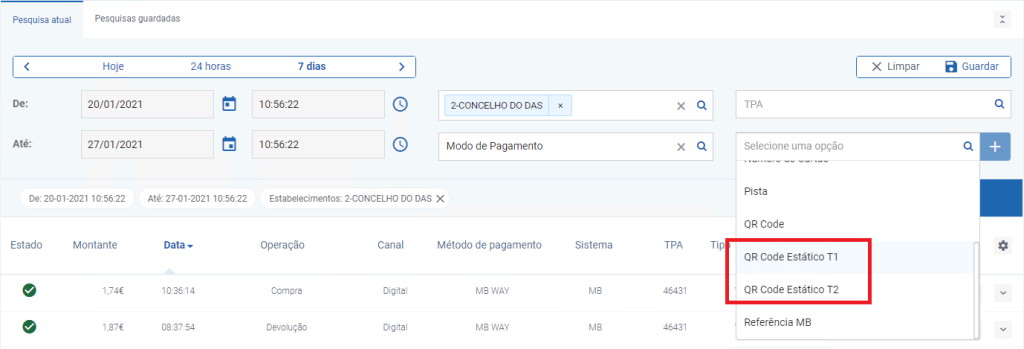
Figure 22 – Select “Payment Method” through the “Other Filters” Option
Combining multiple filters allows users to narrow the list of transactions according to the selected search criteria.
Importing Static QR Codes
The Backoffice supports the bulk creation of Static QR Codes by importing data from a CSV file.
This functionality simplifies the registration of multiple Static QR Codes by allowing merchants to upload product information in a single operation using a CSV file that follows the format supported by the SIBS Backoffice.
To import Static QR Codes:
Step 1. Open the Static QR Codes area.
Step 2. Select Import QR Codes.
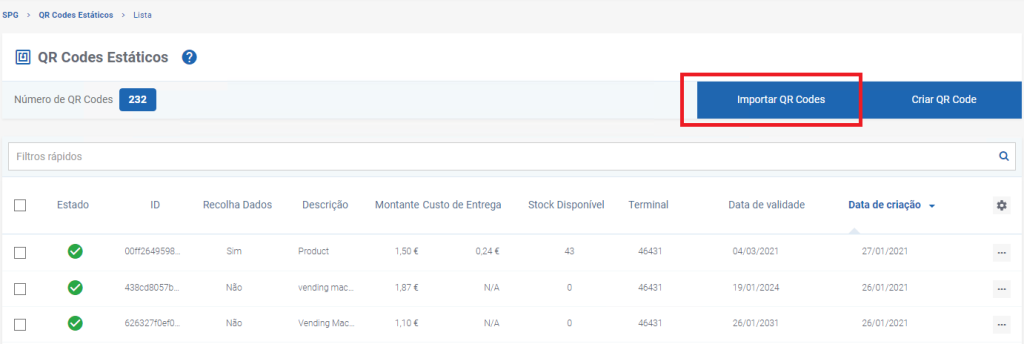
Figure 23 – Import QR Codes
The Backoffice displays the import interface.
Step 3. Select the CSV file containing the Static QR Code information.
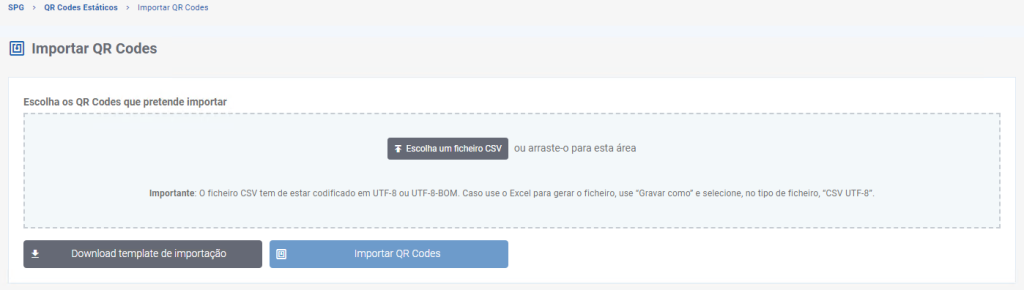
Figure 24 – Import QR Codes via CSV File
Step 4. Confirm the import operation.
The Backoffice validates the uploaded file and creates the corresponding Static QR Codes using the information contained in the CSV file.
Permissions
Access to the Static QR Codes area is controlled through the SIBS Backoffice permission model.
The Static QR Code functionality available to each user depends on:
- The authenticated user’s profile.
- The permissions assigned to that profile.
- The currently selected merchant.
- The Static QR Codes service being enabled for the merchant account.
As a result, different users may have access to different Static QR Code operations while using the same Backoffice environment.